Let me tell you about last Tuesday. I was standing in the grocery store aisle, staring at a box of “seasonal limited edition” fall cookies. They were cute, sure. Cinnamon sugar swirls, little orange decorations, the whole nine yards. But when I flipped the box over, the price tag made me drop my basket. $8.99 for twelve cookies? That’s more per cookie than a decent slice of pie from a bakery. I put the box back, walked home, and opened my pantry.
I had flour. I had sugar. I had butter that was starting to soften on the counter. I even had that little jar of cinnamon I bought on sale three months ago. I thought, why am I paying premium prices for nostalgia when I can make it myself for pennies?
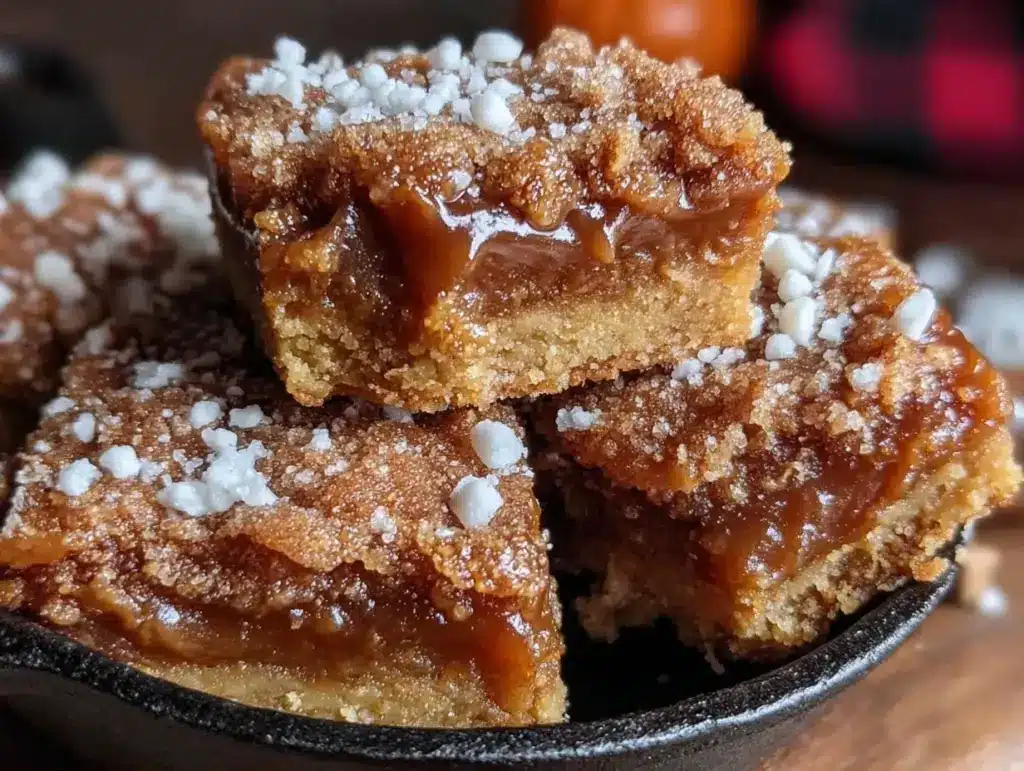
That night, I whipped up a batch of Budget-Friendly Fall Snickerdoodle Sheet Pan Bars. I didn’t use fancy vanilla extract or expensive almond extract. I used what I had. The result? A warm, cinnamon-sugar-spiked dessert that smelled like autumn in my kitchen. My kids devoured them before they even cooled. My husband asked if I’d hired a pastry chef. I told him I just used sheet pan bars because they’re easier to clean than individual cookies.
Since then, I’ve made this Budget-Friendly Fall Snickerdoodle Sheet Pan Bars recipe at least six times. It’s become my secret weapon for hosting without breaking the bank. Whether you’re dealing with a busy school week, need a potluck contribution, or just want to satisfy a sweet tooth without the guilt of a high price tag, this recipe is your answer. It’s simple, it’s affordable, and it tastes like home. Let’s get into why this specific approach to snickerdoodles works so well for real families.
Why You’ll Love This Recipe
Look, I’m not going to pretend I have a degree in culinary arts. I’m a parent who needs to feed three growing humans and keep the house running. That means I need recipes that are forgiving, cheap, and fast. This Budget-Friendly Fall Snickerdoodle Sheet Pan Bars hits every single one of those marks.
- It Costs Pennies Per Serving — I did the math. For a 9×13 pan of bars, it costs me about $4.50 total. That’s less than $0.50 per square if I cut them into small bites. Compare that to $2.50 for a single cookie at a cafe, and you see why I stick to this method.
- Pantry Staple Hero — You likely have everything for this Budget-Friendly Fall Snickerdoodle Sheet Pan Bars right now. Flour, sugar, butter, eggs, cinnamon. No need for a special trip to the specialty store for obscure ingredients. It’s cooking, not chemistry class.
- One Pan, Zero Stress — Individual cookies require spacing, rotating pans, and cleaning multiple baking sheets. Sheet pan bars? You mix, you pour, you bake. One pan to wash. This is crucial on weeknights when I’m exhausted.
- Kid-Approved Texture — Some cookies are too hard or too crumbly for little hands. These bars are soft, chewy, and substantial. They don’t crumble everywhere. My youngest (age 4) can hold one without making a mess, which means less cleanup for me.
- Perfect for Meal Prep — I make this on Sunday. It keeps in an airtight container for four days. It’s ready for after-school snacks, lunchbox additions, or last-minute dinner guests. It’s the ultimate “set it and forget it” dessert.
- Freezes Like a Dream — If I have leftovers, I freeze them. Unlike delicate pastries, these bars hold up well in the freezer. I pull them out thawed for a quick treat or warm one up for 10 seconds in the microwave.
This isn’t just a cookie. It’s a strategy for keeping your wallet happy and your family fed. This is my go-to when dinner needs to just work, and dessert needs to happen without drama.
Key Ingredients for Budget-Friendly Fall Snickerdoodle Sheet Pan Bars
Before we start mixing, let’s talk about what’s going into the bowl. I’ve tested this Budget-Friendly Fall Snickerdoodle Sheet Pan Bars with different brands and types, and here is what actually works. I’m not here to upsell you on luxury ingredients. I’m here to help you make the best version with what you have.
All-Purpose Flour
(2 1/2 cups / 315g) — This is your base. Don’t go for “cake flour” or expensive bleached flour. Standard all-purpose is perfect. It gives the bars that sturdy-yet-chewy texture. If you’re worried about gluten, note that this isn’t a gluten-free recipe, but it’s very forgiving. Just don’t pack the flour down too tight when measuring, or your bars will be dry. I use the spoon-and-level method every time.
Unsalted Butter
(1 cup / 226g, softened) — This is where you can save money. You don’t need European-style cultured butter for this. Regular supermarket unsalted butter works perfectly. The key is that it must be softened. If you melt it, you’ll get greasy bars. If it’s cold, your batter will be lumpy. I take it out of the fridge about 30 minutes before I start. Real talk: if you’re in a rush, you can microwave it in 5-second bursts, but watch it closely. You want it soft, not liquid.
Granulated White Sugar
(1 1/2 cups / 300g for batter + 1/2 cup / 100g for coating) — Yes, you use sugar in the batter AND for the coating. Don’t skip the coating step. That cinnamon-sugar crust is what makes it a snickerdoodle. I buy the large bags of sugar. It’s the cheapest ingredient in the store. For the coating, mix your sugar with cinnamon. I use a 3:1 ratio of sugar to cinnamon.
Eggs
(2 large / approx 100g) — Room temperature eggs incorporate better into the butter. If you’re like me and forgot to take them out, crack them into a small bowl of warm water for 5 minutes. They’ll warm up fast. Don’t use small eggs; the recipe is balanced for large ones. If you only have extra-large, you might need to reduce the flour by a tablespoon.
Ground Cinnamon
(2 teaspoons for batter + 1 tablespoon for coating) — This is the star. I have a preference for Ceylon cinnamon because it’s sweeter and less bitter than Cassia, but any ground cinnamon works. If your cinnamon is old and dusty, throw it out. Fresh cinnamon makes a huge difference in flavor. For the coating, I mix 1 tablespoon of cinnamon with 1/2 cup of sugar. This creates that classic snickerdoodle crunch.
Baking Powder & Baking Soda
(1 teaspoon baking powder + 1/2 teaspoon baking soda) — These are your leaveners. They make the bars rise slightly. Check your expiration dates. If your baking soda has been sitting in the back of the cabinet since 2021, it might not work. Test it by dropping a little vinegar on it—if it doesn’t fizz, replace it. For the Budget-Friendly Fall Snickerdoodle Sheet Pan Bars, fresh leaveners mean a better texture.
Salt
(1/2 teaspoon) — Never skip the salt. It balances the sweetness. Without it, the bars will taste flat. I use table salt or kosher salt. Just be consistent.
Vanilla Extract
(1 teaspoon) — Pure vanilla is best, but if you’re on a tight budget, imitation vanilla works fine here. The cinnamon masks a lot of the difference. I usually just use what’s in my cabinet.
Tools Needed
You don’t need fancy equipment. Here’s what I use. If you don’t have these exact items, you can substitute.
- 9×13 Inch Baking Pan — I use a metal pan. Glass pans take longer to bake and can result in darker bottoms. If you only have glass, reduce the oven temperature by 25 degrees. Light-colored metal is best for even browning.
- Hand Mixer or Stand Mixer — I use a hand mixer. It’s faster to clean than a stand mixer for this batch size. If you’re mixing by hand, it’ll take about 5 minutes of arm work. It’s doable, just be patient.
- Measuring Cups and Spoons — Accuracy matters in baking. If you don’t have measuring cups, use a kitchen scale. Weight is always more accurate than volume.
- Parchment Paper — I line my pan with parchment. This is non-negotiable for easy cleanup. You just lift the bars out and discard the paper. No scrubbing stuck-on sugar from your pan.
- Small Bowl — For mixing the cinnamon and sugar coating. Any small bowl works.
How to Make Budget-Friendly Fall Snickerdoodle Sheet Pan Bars
Let’s get cooking. This process is straightforward. I’m walking you through exactly how I do it, step by step.
Step 1: Prep Your Pan and Oven (5 minutes)
Preheat your oven to 350°F (175°C). Line your 9×13 inch baking pan with parchment paper, leaving an overhang on the long sides. This overhang acts as handles to lift the baked bars out later. Grease the parchment lightly with butter or cooking spray. This ensures nothing sticks, even with the sugary coating.
Step 2: Cream Butter and Sugar (3 minutes)
In a large bowl, add your softened butter and 1 1/2 cups of granulated sugar. Beat them together on medium speed until light and fluffy. This takes about 2-3 minutes. You’re incorporating air into the mixture, which helps the bars rise. If you rush this step, your bars will be dense. Look for a pale yellow color and a creamy texture.
Step 3: Add Wet Ingredients (2 minutes)
Add the two eggs and the vanilla extract to the butter mixture. Beat on medium-low speed until combined. Scrape down the sides of the bowl with a spatula to ensure everything is mixed evenly. The mixture should look smooth and homogeneous.
Step 4: Mix Dry Ingredients (1 minute)
In a separate medium bowl, whisk together the flour, baking powder, baking soda, and salt. This ensures the leaveners are distributed evenly so you don’t get bitter spots of baking soda. Whisking takes 30 seconds, but it’s worth it.
Step 5: Combine Wet and Dry (2 minutes)
Gradually add the dry ingredients to the wet ingredients. Mix on low speed until just combined. Do not overmix. Once the flour disappears, stop. Overmixing develops gluten, which makes the bars tough instead of tender. The batter will be thick and sticky. This is normal.
Step 6: Spread Batter (3 minutes)
Transfer the batter to your prepared pan. Use a spatula or your fingers (lightly greased) to spread it evenly into the corners. You want a uniform layer so they bake evenly. Press it down firmly. If it’s uneven, some parts will be raw and others burnt.
Step 7: Add Cinnamon Sugar Coating (2 minutes)
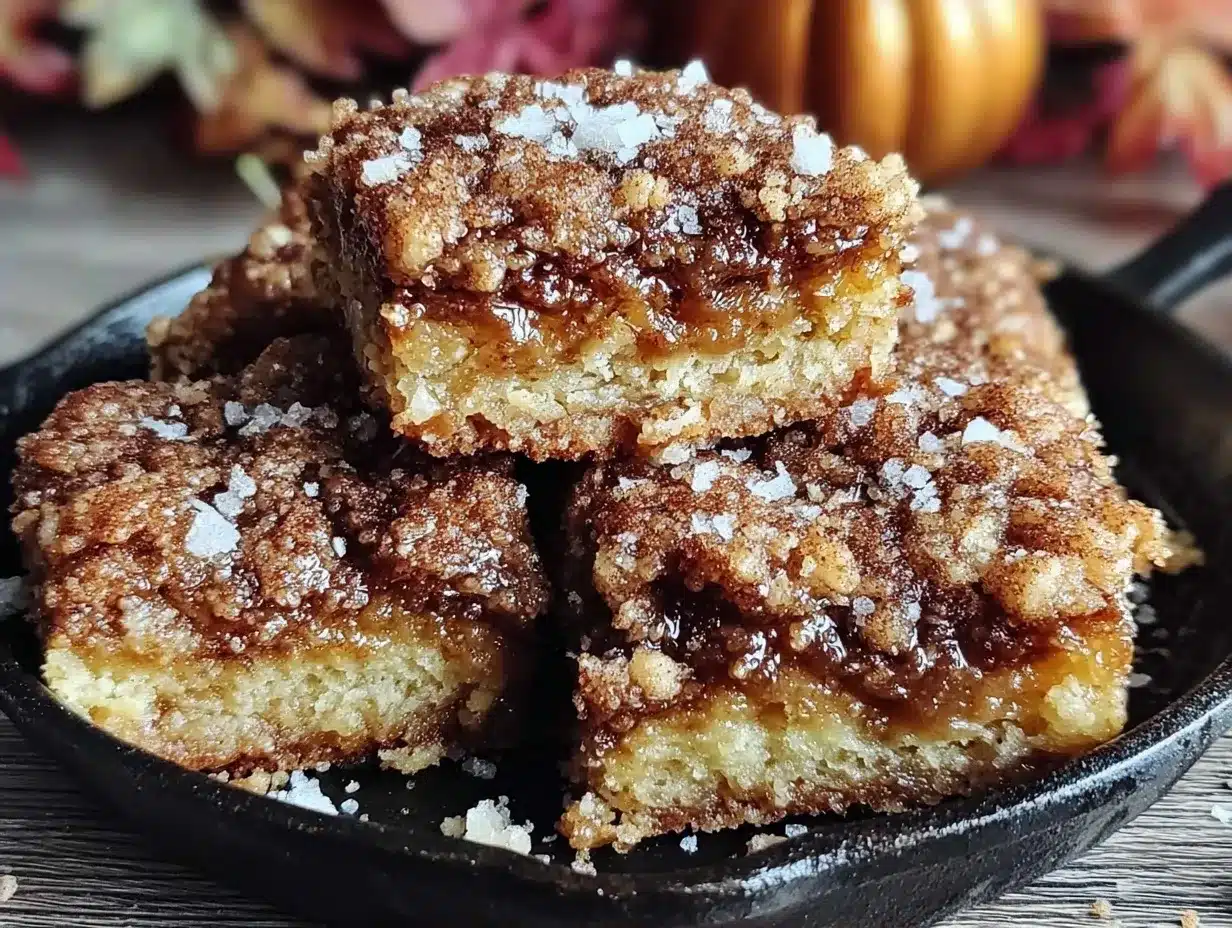
Mix the remaining 1/2 cup of sugar with the 1 tablespoon of cinnamon. Sprinkle this mixture evenly over the top of the batter. Press it down gently so it adheres. This creates that classic snickerdoodle crust. If you skip this, it’s just a cinnamon sugar bar, not a snickerdoodle.
Step 8: Bake (25-30 minutes)
Bake in the preheated oven for 25-30 minutes. The edges should be golden brown, and the center should be set but slightly soft. A toothpick inserted into the center should come out with a few moist crumbs, not wet batter. If the top is browning too fast, cover it loosely with foil after 20 minutes.
Step 9: Cool and Cut (30 minutes)
Let the bars cool in the pan for at least 30 minutes. This is the hardest part. If you cut them hot, they will fall apart. Once cooled, lift them out using the parchment overhang. Cut into squares. I cut mine into 24 squares. You can cut them smaller for snacks or larger for dessert.
Total time: About 45 minutes from start to finish, plus cooling time.
Expert Tips from My Kitchen
Here’s everything I learned from making this too many times. These tips will save you from common mistakes.
Don’t Overbake
This is the #1 mistake. Sheet pan bars continue to cook after you take them out of the oven. If you wait until they look completely dry, they will be hard and crumbly once cooled. Pull them when the center still looks slightly underdone. They will firm up as they cool. I’ve ruined batches by waiting too long. Trust the toothpick test: moist crumbs are good.
Softened Butter is Key
If your butter is too cold, it won’t cream properly with the sugar. The result is a dense, heavy bar. If you’re in a hurry, cut the butter into small cubes and let them sit at room temperature for 15 minutes. This speeds up the softening process. I’ve learned this the hard way when I tried to bake with cold butter and ended up with a brick.
Use Parchment Paper
I cannot stress this enough. Without parchment, you will be scrubbing sticky sugar off your pan for days. With parchment, you lift the bars out and toss the paper. It’s a game-changer for cleanup. I buy parchment in rolls. It’s cheaper than buying pre-cut sheets.
Double the Batch
Since the ingredients are cheap, I often double this recipe. I use two 9×13 pans if I have them. If not, I bake one, cool it, and bake the second batch in the same pan. It’s efficient and ensures I have enough for the week. I store them in separate layers in the fridge.
Storage Hack
If you’re sending these to school, wrap them individually in plastic wrap. They stay fresh longer and are easier for kids to handle. I do this for my son’s lunchbox. It’s a nice surprise after a long day.
Recipe Variations
Once you’ve nailed the basic version, here’s how to mix it up. These variations keep things interesting without complicating the process.
Apple Cinnamon Version
Finely grate one small apple (about 1/2 cup) and fold it into the batter before spreading. The moisture adds a cake-like texture. It pairs beautifully with the cinnamon sugar. I’ve made this for fall potlucks, and it’s always a hit.
Peanut Butter Swirl
Drizzle 2 tablespoons of peanut butter over the batter before adding the cinnamon sugar. Use a knife to swirl it in. It adds protein and a savory contrast. This is great for kids who like peanut butter. It’s similar to the technique used in cake mix peanut butter blossom cookies, but simpler.
Chocolate Chip Addition
Sprinkle 1/2 cup of chocolate chips over the batter before the cinnamon sugar. The combo of cinnamon and chocolate is surprisingly good. It’s like a snickerdoodle meets a chocolate chip bar.
Gluten-Free Option
Use a 1:1 gluten-free flour blend. Make sure it contains xanthan gum. If it doesn’t, add 1/2 teaspoon. The texture will be slightly more delicate, but it works well.
Dairy-Free Option
Substitute the butter with a dairy-free butter alternative that is solid at room temperature. Coconut oil works too, but it will add a slight coconut flavor. I prefer the butter alternative for a neutral taste.
Serving & Storage
Serving
I serve these warm, but they’re delicious at room temperature. They pair well with a glass of cold milk or a cup of coffee. For a fall gathering, I serve them with a side of crunchy carrot raisin salad to balance the sweetness. They’re also great with baked banana nut breakfast muffins for a brunch spread.
Storage
Room Temperature: Store in an airtight container for up to 3 days. Place a slice of bread in the container to keep them soft. The bread absorbs moisture from the air, keeping the bars tender.
Refrigerator: They keep for up to 5 days in the fridge. Let them come to room temperature before eating for the best texture.
Freezer: These freeze perfectly for up to 3 months. Wrap them tightly in plastic wrap, then put them in a freezer bag. Thaw overnight in the fridge or at room temperature. I freeze extras to have a quick dessert ready for unexpected guests.
Nutrition Information
I’m not a nutritionist, but here’s the breakdown per bar (assuming 24 bars).
| Nutrient | Amount |
|---|---|
| Calories | 180 |
| Protein | 2g |
| Carbs | 28g |
| Fiber | 0.5g |
| Fat | 8g |
| Sodium | 120mg |
My Take: This is comfort food with cream and cheese. Not diet food. It’s high in sugar and carbs. But it’s better than takeout and I know what’s in it. I enjoy one or two bars as a treat. It’s a balance.
Final Thoughts
Making Budget-Friendly Fall Snickerdoodle Sheet Pan Bars at home has saved me money and stress. It’s a simple recipe that delivers big flavor. I love that I can make it with ingredients I already have. It’s perfect for busy weeknights, potlucks, or just satisfying a craving.
If you make this, drop a comment! I love hearing how it turns out in your kitchen. Do you add extra cinnamon? Do you freeze them? Let me know. And if you’re looking for more easy treats, check out my Italian anise cookies or my brown butter toffee cookies. Happy cooking!
FAQs
Can I use margarine instead of butter?
Yes, you can. However, the flavor won’t be as rich. Margarine has higher water content, which can affect the texture. If you use it, make sure it’s softened properly. I prefer butter for taste, but margarine works in a pinch.
Why did my bars turn out dry?
This usually happens if you overbake them or pack the flour too tightly. Make sure to spoon and level your flour, not scoop it. Also, pull the bars out when the center is still slightly soft. They will continue to cook as they cool.
Can I make these ahead of time?
Absolutely. I make them on Sunday for the week. They stay fresh in an airtight container for 3-4 days. You can also bake them, cool them, and freeze them for later. Just thaw before serving.
Is there a way to make them less sweet?
You can reduce the sugar in the batter by 1/4 cup, but it might affect the texture. The cinnamon sugar coating is optional if you want to cut sugar. I recommend keeping the coating for the classic snickerdoodle experience.
Can I double the recipe?
Yes. I often double it. If you do, use two 9×13 pans or bake in two batches. Increase the baking time slightly if you bake a thicker layer, but keep an eye on them. The recipe scales well.
What if I don’t have parchment paper?
You can grease the pan thoroughly with butter or cooking spray. However, cleanup will be harder. The sugar coating can caramelize and stick. Parchment paper is highly recommended for easy removal.
How do I store leftovers?
Store in an airtight container at room temperature for up to 3 days. For longer storage, refrigerate for up to 5 days or freeze for up to 3 months. Wrap tightly in plastic wrap for freezing.
Pin This Recipe!

Budget-Friendly Fall Snickerdoodle Sheet Pan Bars
- Total Time: 45 minutes
- Yield: 24 servings 1x
Description
A simple, affordable, and kid-approved dessert made with pantry staples. These sheet pan bars capture the warm cinnamon-sugar flavor of snickerdoodles with minimal cleanup and maximum yield.
Ingredients
- 2 1/2 cups all-purpose flour
- 1 cup unsalted butter, softened
- 1 1/2 cups granulated white sugar (for batter)
- 1/2 cup granulated white sugar (for coating)
- 2 large eggs, room temperature
- 1 teaspoon vanilla extract
- 2 teaspoons ground cinnamon (for batter)
- 1 tablespoon ground cinnamon (for coating)
- 1 teaspoon baking powder
- 1/2 teaspoon baking soda
- 1/2 teaspoon salt
Instructions
- Preheat oven to 350°F (175°C). Line a 9×13 inch baking pan with parchment paper, leaving an overhang on the long sides, and grease lightly.
- In a large bowl, cream the softened butter and 1 1/2 cups of sugar together on medium speed until light and fluffy, about 2-3 minutes.
- Add the eggs and vanilla extract to the butter mixture. Beat on medium-low speed until combined, scraping down the sides of the bowl.
- In a separate medium bowl, whisk together the flour, baking powder, baking soda, and salt.
- Gradually add the dry ingredients to the wet ingredients, mixing on low speed until just combined. Do not overmix.
- Spread the thick batter evenly into the prepared pan, pressing firmly into the corners.
- Mix the remaining 1/2 cup of sugar with the 1 tablespoon of cinnamon. Sprinkle evenly over the batter and press gently to adhere.
- Bake for 25-30 minutes, or until edges are golden brown and the center is set but slightly soft. A toothpick should come out with moist crumbs.
- Let the bars cool in the pan for at least 30 minutes before lifting them out using the parchment overhang and cutting into squares.
Notes
Ensure butter is softened but not melted for best texture. Use the spoon-and-level method for flour to avoid dry bars. Bars continue to cook after removal from the oven, so do not overbake. Store in an airtight container at room temperature for up to 3 days, or freeze for up to 3 months.
- Prep Time: 15 minutes
- Cook Time: 30 minutes
- Category: Dessert
- Cuisine: American
Nutrition
- Serving Size: 1 bar (approx. 1/24
- Calories: 180
- Sugar: 20
- Sodium: 120
- Fat: 8
- Saturated Fat: 5
- Carbohydrates: 28
- Fiber: 0.5
- Protein: 2
Keywords: snickerdoodle bars, sheet pan bars, budget baking, fall dessert, easy cookies, cinnamon sugar bars, kid-friendly dessert